Connecting a digital camera or scanner to your PC is extremely easy, especially if you have a newer model with a USB or FireWire connection. With this type of setup, Windows will recognize your camera or scanner as soon as you plug it in and will install the appropriate drivers automatically.
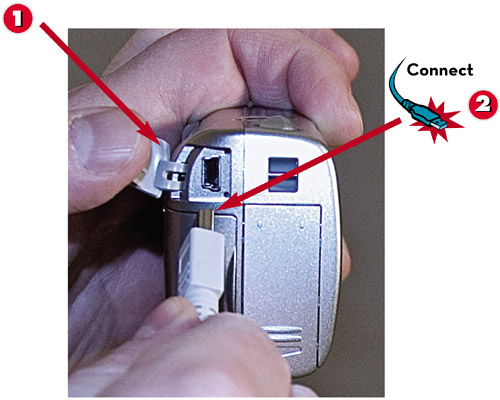
 On your digital camera, locate and open the cover to the data transfer port.
 Connect one end of the USB cable to the data transfer port on your digital camera.
 Connect the other end of the USB cable to a USB port on your PC.
 Turn on your digital camera and (if necessary) move the selection dial or switch to the transfer pictures setting.
 This should automatically open the Removable Disk dialog box.
 Click Copy Pictures to a Folder on My Computer Using Microsoft Scanner and Camera Wizard.
 Click OK.TIP
 Copying ManuallyIf the Device Connect Autoplay dialog box doesn’t open automatically when you connect your camera, open it manually by clicking the Start menu, selecting My Pictures, and then clicking Get Pictures from Camera or Scanner.
 Click Next to display the photos stored on your camera.
 Check those photos you want to copy.
 Click Next.TIPRotating PicturesIf a picture was taken sideways, you can rotate the photo to the portrait orientation by clicking one of the Rotate buttons at the bottom of the Choose Pictures to Copy screen.

 Enter a name for this group of pictures.
 Click the Browse button and select the destination folder for your pictures.
 Click OK.
 Click Next to copy the selected pictures.TIPNaming Picture GroupsWindows automatically names all picture files in the same group starting with the name you supply and then adding 001, 002, 003, and so on.TIPDelete Pictures from Your CameraAfter you’ve transferred all the pictures from your camera to your PC, you can delete the pictures stored on your camera to free up space for more photos. Just check the Delete Pictures from My Device After Copying Them option.
 After the photos are copied, select Nothing, I’m Finished Working with These Pictures.
 Click Next.
 Click Finish to complete the wizard and view your photos.
CAUTION
Turn Off Your Camera
Don’t forget to turn off your camera when you’re done transferring pictures. If you leave your camera on, you’ll drain your batteries!
Leave a Reply