If your photos are of the old-fashioned print variety, you can still turn them into digital files using a flatbed scanner. When you initiate a scan, Windows automatically launches the Scanner and Camera Wizard, which lets you control how your picture is scanned.
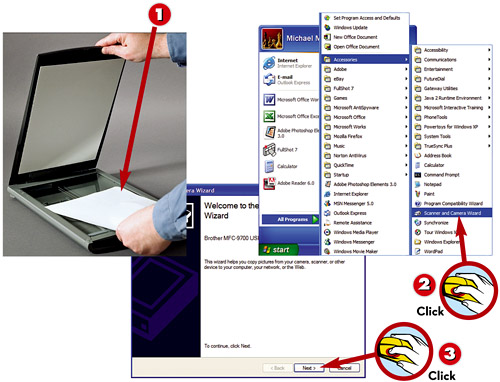
 Open the scanner lid and place a photo on the scanner glass, face down.
 Click the Start button and select All Programs, Accessories, Scanner and Camera Wizard.
 Click Next.TIP
 Scan AutomaticallySome scanners activate the Scanner and Camera Wizard automatically when you press the Scan button on the scanner.
 Select a picture type.
 Click the Preview button. Your scanner will now make a preview scan.
 If necessary, drag the borders of the preview picture to crop the area selected.
 Click Next to continue.TIPReposition the ItemIf you don’t like the preview scan, reposition the item on your scanner and click the Preview button again to start a new scan.TIPHigher ResolutionBy default, Windows scans your item at 150dpi (dots per inch). If you plan to print the photo, click the Custom Settings button and select a higher resolution, such as 300dpi.
 Enter the name for this group of pictures.
 Select a file format from the list.
 Click the Browse button to select the destination folder for the photos, or select a location from the pull-down list.
 Click Next.TIPFile FormatsFor the best quality for photo prints, save your scan in TIF format. For use on the Web or to send photos via email, save your scan in JPEG format.
 When the scan is complete, select Nothing, I’m Finished Working with These Pictures.
 Click Next.
 Click Finish to exit the wizard.
TIP
Other Options
The other options at the conclusion of the wizard let you transfer your scanned photo to a website or order photo prints of the item.
Leave a Reply